If your PC came with Windows 8/8.1 pre-installed, chances are you didn’t receive a System Repair Disc or Windows installation DVD along with it.
The problem is you’re eventually going to need a way to repair or re-install Windows because your computer WILL fail to start up properly at some point due to a bad/corrupt hard drive, a virus, a failed update or some other problem.
Trust me, a damaged file system or hard drive failure WILL happen sooner or later, and if you don’t have a System Repair Disc and a recent backup on hand your computer will become about as useful as a broken down car.
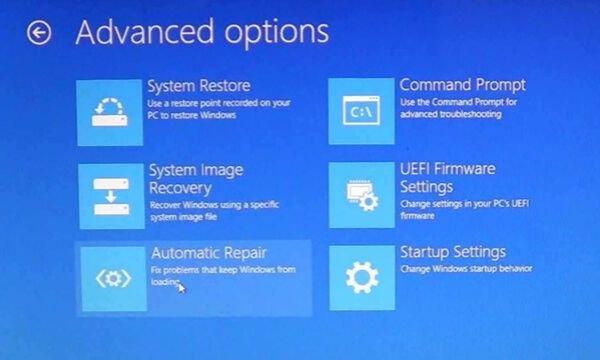
A system repair disc is a bootable disc that you can create on a working computer with Windows, and use it to troubleshoot and repair system problems on other Windows computers that are malfunctioning. A System Repair disc for Windows 8, includes the following troubleshooting tools: System Restore, System Image Recovery, Startup Repair and the Command Prompt.
A system repair disc is not the image of the product as OEM factory recovery/restore/repair disc. A system repair disc can’t be utilized to install Windows 8. A freshly made 32-bit system repair disc can only be made in a 32-bit Windows 8, and utilized to mend a 32-bit Windows 8. A freshly made 64-bit system repair disc can only be made in a 64-bit Windows 8, and utilized to mend a 64-bit Windows 8. Windows 8.1 no more supports the feature of creating a system repair disc CD/DVD by using the procedure in this article. If you want, you can as well boot from your Windows 8.1 installation media or from a prepared recovery drive (USB) for the system recovery choices.
Luckily, the tasks of creating a System Repair Disc (CD/DVD) and backing up your hard drive are quite easy to accomplish with Windows 8/8.1.
Here are step-by-step instructions:
After you boot from the system repair disc, you will be required to choose your language and keyboard layout (if shown) for Windows 8, then choose Troubleshoot to view the system recovery choices.
1. Insert a blank unformatted CD or DVD into your CD/DVD drive.
2. Press the windows key + R keys, type recdisc, press Enter.
3. Open the Control Panel, and click on the Recovery icon.
For performing this, you must be logged in as an administrator.
A) Unplug all plugged in USB flash drives.
B) Click on the Create a recovery drive link.
If asked upon by User Access Control Setting, press Yes.
Click on Next
C) Click/tap on the Create a system repair disc with a CD or DVD instead link. (You will not see this link if you a USB flash drive plugged in.)
4. Click on Create disc
5. The system repair disc will now commence to be made.
6. When the process has been completed, detach your CD/DVD, label it decently for your 32-bit or 64-bit Windows 8 startup repair disc, and click on Close.
7. Click on OK and close it.